Procedural Tilemap Generator
A downloadable Tilemap generator for Windows
Dynamic Procedural Tile generation will generate tilemaps based on given tiles. It will also allow to modify the map during the runtime and adjust the world (tilemap) to the added tiles. Descriptive tiles are the tiles which contain descriptions of what is depicted on it. See more about them in the section Descriptive tiles.
Main Feature:
1. Procedurally Generating tilemaps.
2. Modifying the generated tilemaps and adjusting the map to it.
3. Add Custom Tiles to be used to create tilemaps and to be used for dynamic modifications.
How To Use:
The application has a simple UI which allows you to either choose prepared tile sets or use your own. You will see a drop-down menu with the options. The ready tile sets are mainly to see how everything works and test the limits. I haven't tested it with more than 416 tiles. ( With 416 tiles the map succeeded to complete generation without holes only in 80% of times. )
If you want to use your own tiles, you have two options.
1st, more mechanical option. You will need to go to the application's folder, enter into TilemapGenerator_Data folder, and create a "CustomSet" folder. The letter's case is important! After it, you need to place your tiles into that folder. The tiles have to be named according to guidelines. (see bellow in Guidelines) After you've done the following, you can press generate, and voila.
2nd option is to select the tiles from the app. When you press "Custom Tiles" button, you will be asked to name your tileset. Then you will be presented with another menu where you can manually include pngs for the tiles. You will also be asked to name each of them( follow naming guidelines to make it work). There is an example in the application, as well as in the tutorial. When you're done with the steps, press next and done.
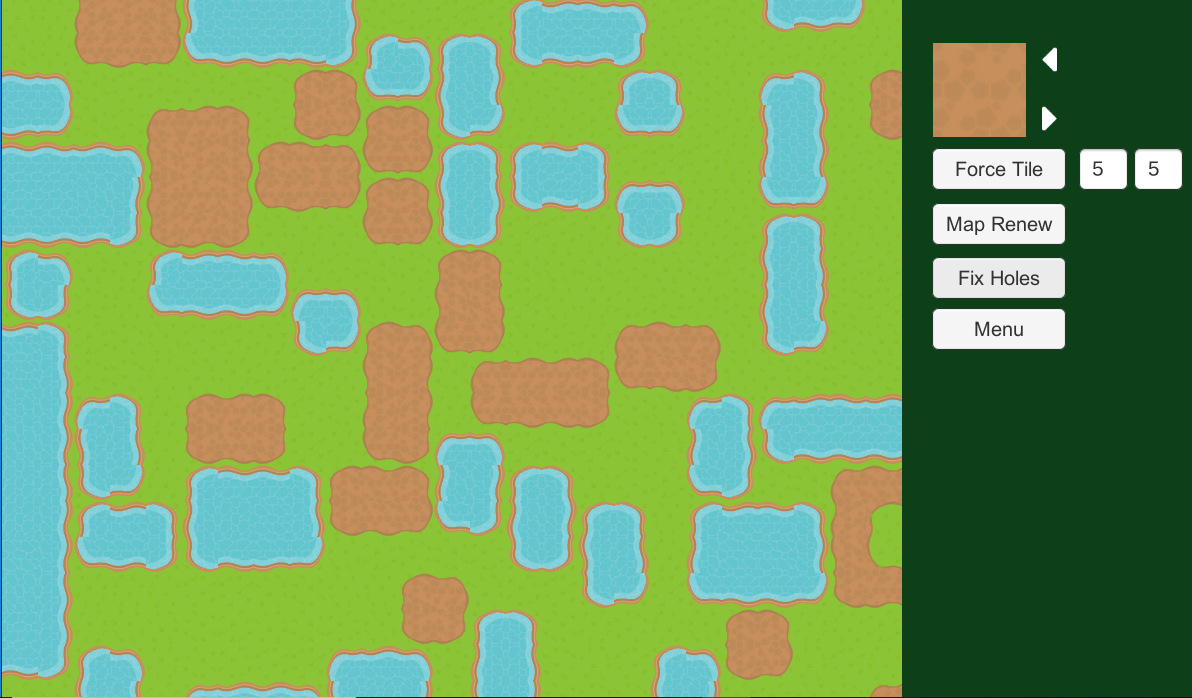
After Tiles are selected, the application will do some work behind the curtains to make tiles usable for its needs and will generate a tilemap. There are a few buttons you can have fun with.
Force Tiles. The button will add the tile you see above the button at the coordinates presented on the right of the button. You can change with left and right arrows the tile which you want to insert. Insertion will remove all neighbors so you can press Fill Hole and witness the magic.
Map Renew. As the name suggests, pressing the button will generate the map anew. It will take a less-expensive generation method, so if you end up holes just press Fill Holes. the chance is, it will fix itself in a few seconds.
Fill Holes. This will trigger the dynamic generation. If you have no holes on the map, then it won't change anything. The adaptation can cause the entire map to change. In the future, I will add options for restricting its range.
Pressing Esc (escape) at any point will quite the application.
Descriptive Tiles.
Descriptive tiles are designed to make the procedural generation accessible for non-It people, mainly designers. They have descriptions of what is going on in the borders. The program uses those descriptions to make sure it creates an eye-pleasing continuous world. In the future I might attach a paper which describes them in more details. As of now, let's consider an example.

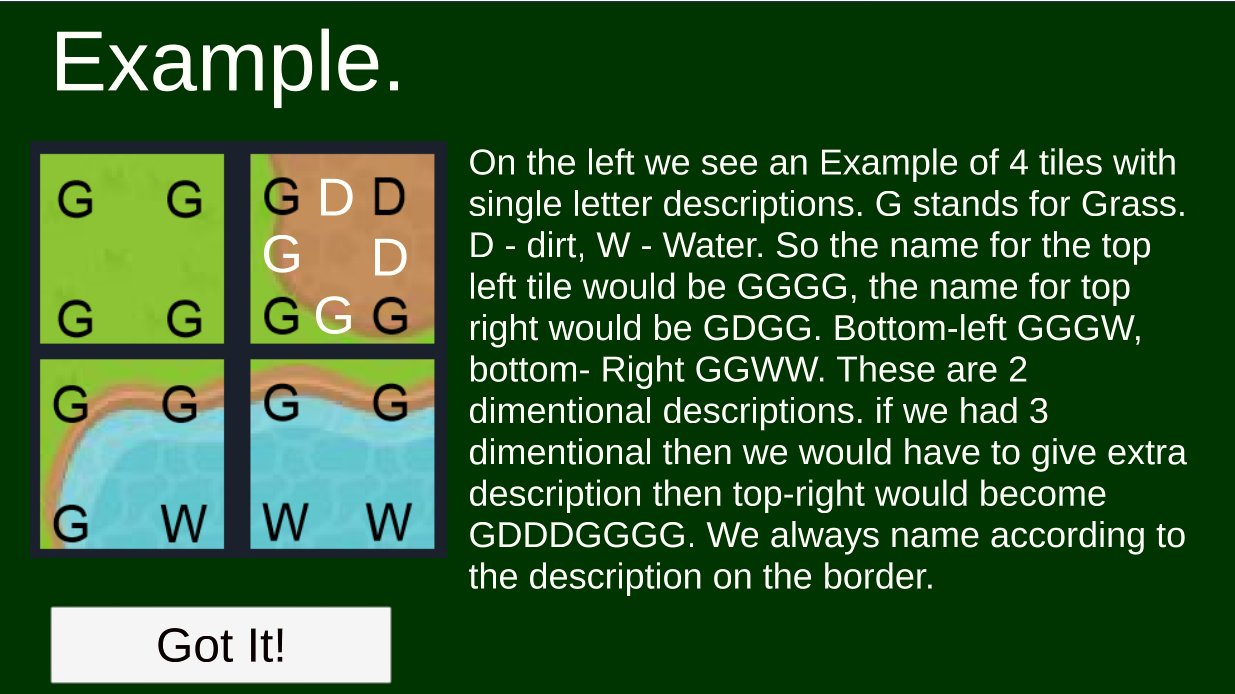
In the above picture, we see a tileset which contains three descriptions. They are G - Grass, D - Dirth, W- water. The tiles have 2 descriptions for each border. That is, for understanding if the middle tiles can be together, the program will check if the first has GW on the right border while the left has GW on the right border.
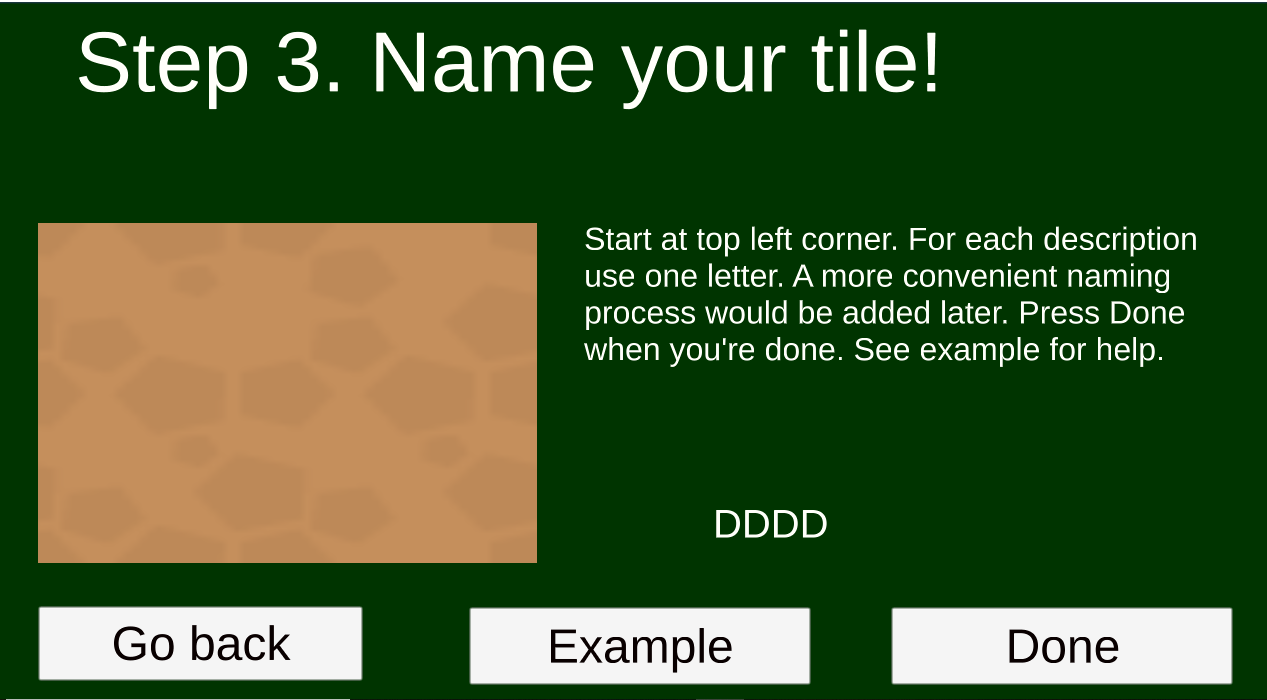
For naming such tiles we start at the top-left corner. So the top-left tile would have the name GGGG. The one on its right will have GDGG. The one on the middle-left GGWG. Middle-right is GGWW. Bottom-left is GWWG, and Bottom-right is WWWW. See the tutorial to understand better.
So if you want to name your tiles you need to follow the following logic for the program to be able to match your tiles as you intend to.
You are not bound to 2 descriptions per border. For example, if we want them to have 3 descriptions, we would name the top tiles as GGGGGGGG and GDDDGGGG. Please notice that we focus on the borders. Having more than two descriptions can help if we have similar tiles with different proportions. Otherwise, we can have not matching tiles as in the example below.

So in the above picture the proportion of dirt and grass can vary from 3:0, 2:1 to 1:2, 0:3, thus it would be better to have 3 descriptions. Also we might want to allow such combinations. In a larger scale it doesn't look that bad. (this example is generated from the 3 tileset provided in the program).
This is about it about descriptive tiles. They have a few advantages from the others, but the main point is to be able to deal with irregular shapes and to not have to check all the pixels for matching. Also, they are easier to deal for people without technical background. Currently, you will have to name them with one-letter descriptions and keeping track of borders yourself, however as soon as I get free time I will make a helper which will ask you to describe the borders and will do the rest behind the scenes.
Guidelines.
Naming Tiles. In the current version, you'll have to stick with one-letter descriptions and remember them yourself. (I will increment the UI to take care of all this in the future.) Let's go one more time over how to name the tiles. You will have to associate a letter with each description. Each tile has four borders: on the top, on the left, on the right, and the bottom. You need to start from describing the top part, then go to the right -> to the bottom -> to the left. Please note, that the description which will end the top border, will also be the beginning for the right border. That is, you don't need to provide the first description of any border but top. Thus in the 1st example image, GDG describes both top and left parts of the tile ( the one in the top-right). Here "GD" is for the grass and dirt on the top, and DG is for Dirt and Grass on the right. All tiles have to be 64p by 64p. The program will work with other ratios, but the results would be poor.
Creating Folders. Be careful when naming your tiles. You will be asked to name them in Custom tiles. Doing so will create a folder with the following name. If you already created it, the program won't delete its files. It's done on purpose in case you want to add more tiles. In the future, I will add an option to allow to whip the folder clean before usage.
Future Plans.
There is still a lot I want to add, but unfortunately I successful overloaded myself with enough projects to not have free time. If you are interested in this project, and you would like to see a specific feature implemented, let me know. Then I will devote more time to that particular feature. I might also get encouraged by the fact that someone needs it and cut an hour of sleep to do it.
Anyway, in no specific order, here are the plans:
1. Accept more formats for tiles. Only png is supported currently. ( I literally just have to test if the program successfully generates sprites from other extensions in runtime. )
2. Add option to customize the map height and width.
3. Enable downloading the final map to be used in games or in other places. ( if you need this let me know. Also knowing what format would work for you the best will help)
4. To add at point 3, There is a plan to refactor the project and make it an asset.
5. Add WebGl version. (For taking files in web application there is slightly more work that has to be done.)
6. Enable specifying the max range for adjusting the generation. That is if you changed a tile in a specific place and you want to ensure that only tiles not further than 4 tiles away will be affected by the dynamic adaptation of the map then you will need this.
7. Rework "force tile" to allow inserting tile without removing its neighbors.
8. Make the rotations and reflections optional. ( I literally need to write a few lines of code for this, so if you need this let me know. Otherwise I will do this if I suddenly get struck by desire to do it or will need it in my own games.)
9. Make a better, more user-friendly UI.
10. Add prey-predator models and environments. This will help to see how they will affect the map and what changes they will cause. It's partially implemented, but there is still work to be done to complete it. (much free time required)
11. Other things that I forgot to mention.
12. Implement image processing/ML, which will enable to identify the descriptions on the tile without need for you to describe them. ( If you want this I am sorry. I won't be doing this unless I will be doing this as a research project in my university or as a PhD project)
Anyway, if you are interested in a similar tool, but really need some of the above features, or something else, let me know. Some of them are easy to do, I just didn't see a point to waste time on it.
Credits:
The project is made with Unity. I had been using tiles found in Kenney Assets. Also, I was using a Simple Browser asset from Unity Asset store. ( I slightly modified it, but I might be implementing my own in the future.)
If you are interested in the procedural generation, there are two pages I will advise you to check out. I took from there the initial inspiration. The first is WaveFunctionCollapse : https://github.com/mxgmn/WaveFunctionCollapse
and the second is the pagel by Isaac Dykeman: http://ijdykeman.github.io/ml/2017/10/12/wang-tile-procedural-generation.html ( I tried to check the algorithm mimicking tiles seen in his videos.)
Also, there is a Procedural generation wiki which is pretty helpful: http://pcg.wikidot.com/
If you want to contact me, you can email at serobyanaram@gmail.com
or contact me through twitter. https://twitter.com/SerobyanAram
Download
Install instructions
Unpack the archive.
Launch TilemapGenerator.

Leave a comment
Log in with itch.io to leave a comment.